Dinov2 Image classification, retrieval, visualization, and paper review
Published:
Visualization of Image features with PCA Components
- Paper Review
- Principal Components Visualization
- Classification with DinoV2
- Image Retrieval with DinoV2
1. Paper Review
There are many other great blogs that have long reviews. I will keep My findings short here. DINO(Slef DIstilation with NO labels).
- Dino, CLIP, iBot, DinoV2, SimCLR, and BYOL belongs to the Self-Supervised Learning class.
- The key Idea is to Generate ALL Purpose Visual features(like LLM in NLP) without Finetuning. Using Text at the Time of Pre-Training like in CLIP, is kind of limiting the information available in the Image. It only emphasizes the Rich features in Images, but complex pixel-level information may not surface with limited Text used.
- These purpose features in DinoV2 achieved good performance on Downstream tasks better than Task-specific Models and better than the existing SOTA models.
- Researchers used a Large, Curated, Diverse Dataset(LVD-142M) to produce these features & An automatic pipeline is created to collect, clean, and process the data. Its the power of the curated dataset that somewhat powers Dino
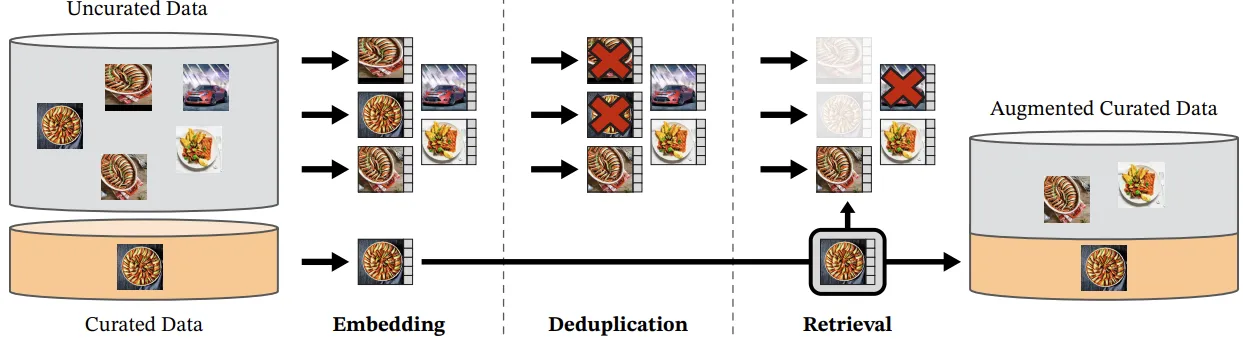 Automated pipeline to create a dataset.
- DinoV2 used iBot design choices for both image and patch-level features.
- With these all-purpose features, it Acts as a Backbone for Classification, Segmentation, instance retrieval, and more.
- A student-teacher mechanism is used. The student model(small) tries to imitate the same as the larger teacher model keeping performance fixed.
- Cross-Entropyloss is used for student-teacher feature similarities keeping the VIT model common in both for Image level learnings. Random crops of the same image are used for Image level learnings.
- Randomly applying Mask to the input patches to the student, but not to the teacher & CELoss here again, is used for Patch Level learnings.
- Patch level and Image level learnings are for Global and local understanding of image features.
Few key points:
- Sinkhorn-knop batch normalization is used.
- Koleo Regularizer for the distance between any point to another point in batch.
- 518*518 Resolution for better features.
- Usage of Flash attention to improve memory usage & to speed up self-attention layers.
- Using the same forward pass for Global and local crops unlike in DinoV1.
- stochastic depth, to skip the computation of dropped residuals rather than masking.
- Use of FSDP with Adam-W optimizer in float 32 precision, but broadcasting and reducing weights to float16.
Most of the Above mentioned are not implemented in DinoV1. Check the Paper for a more in-depth read.
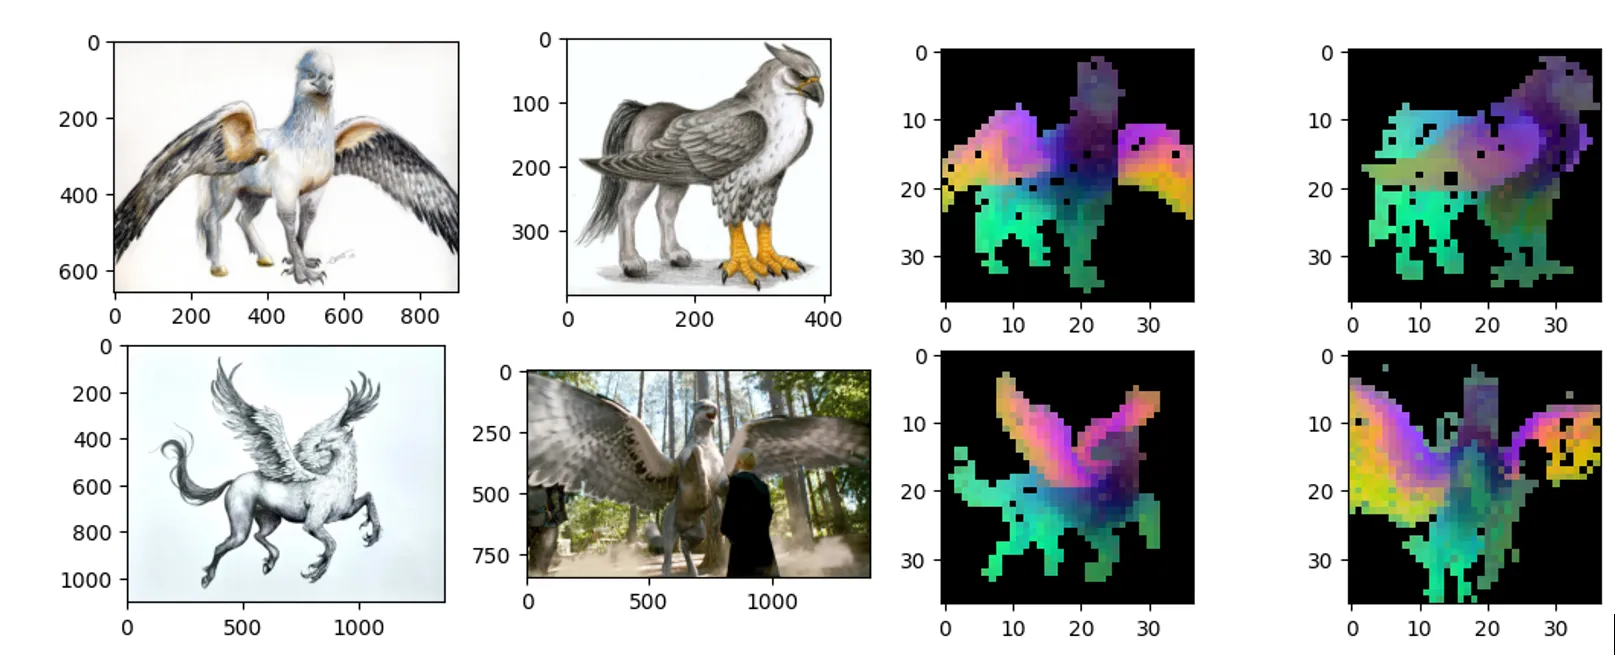
Feature Visualization
As we talked about above, features for similar images also look similar that showcasing the model’s capability to generalize between classes. I wanted to visualize them as they showed on paper.
- Load the model
# I have used large model, & suggest the large or gaint model. dinov2_vitl14 = torch.hub.load('facebookresearch/dinov2', 'dinov2_vitl14') - Add transforms to load images. 518*518 resize as shown in the paper.
# image transformations
transform1 = transforms.Compose([
                                transforms.Resize(520),
                                transforms.CenterCrop(518), #should be multiple of model patch_size
                                transforms.ToTensor(),
                                transforms.Normalize(mean=0.5, std=0.2)
                                ])

patch_size = dinov2_vitl14.patch_size # patchsize=14

#520//14
patch_h  = 520//patch_size
patch_w  = 520//patch_size

feat_dim = 1024 # vitl14
- Send the batch of 4(or any) to the model and extract the features.
folder_path = "harryported_giffin_images/"
total_features  = []
with torch.no_grad():
  for img_path in os.listdir(folder_path):
    img_path = os.path.join(folder_path, img_path)
    img = Image.open(img_path).convert('RGB')
    img_t = transform1(img)

    features_dict = dinov2_vitl14.forward_features(img_t.unsqueeze(0))
    features = features_dict['x_norm_patchtokens']
    total_features.append(features)

total_features = torch.cat(total_features, dim=0)
total_features.shape
one should get the size of the torch.Size([4, 1369, 1024]), if followed above instructions.
I have Applied 2-Step PCA as mentioned in the paper. Check out the link below for the code.
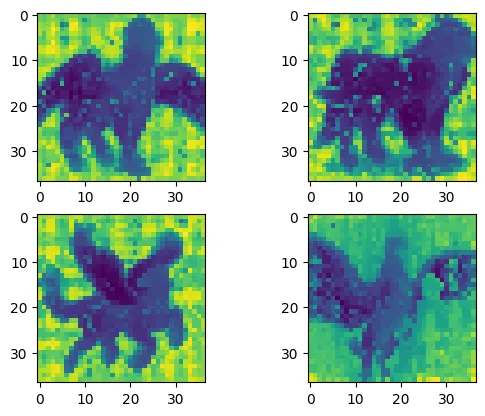 single step PCA visualization.
we eliminate the background and again apply a second step PCA on foreground image features only.
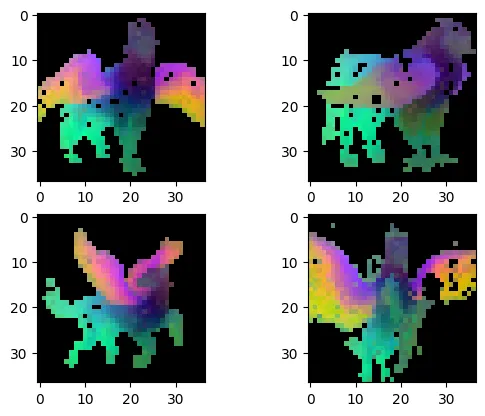 Features after 2nd PCA applied.
check the CODE repo here
2. Image Classification
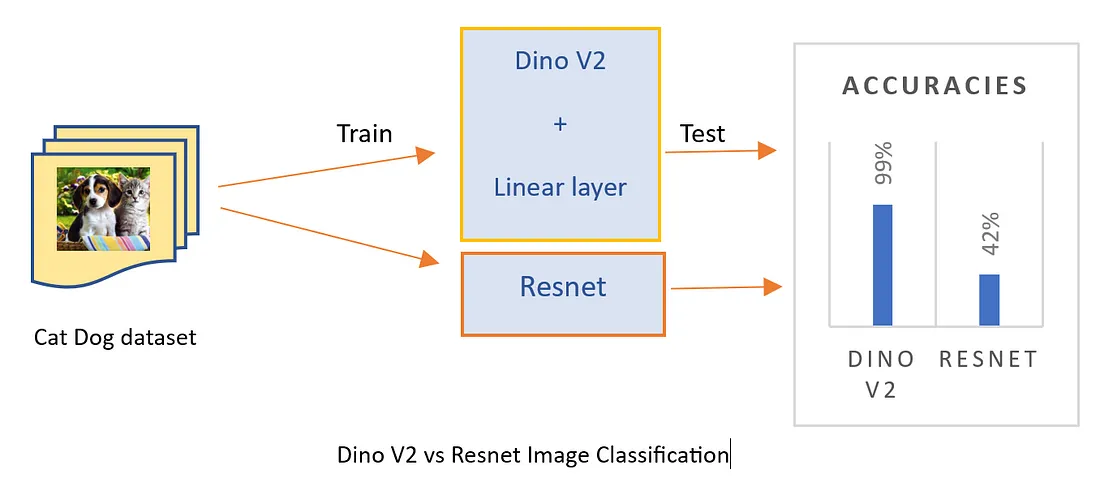 dinov2_vs_resnet
Like we do train a regular Image classification model, we do the same procedure here. I added another linear layer in addition at the end of the original model.
class DinoVisionTransformerClassifier(nn.Module):
    def __init__(self):
        super(DinoVisionTransformerClassifier, self).__init__()
        self.transformer = dinov2_vits14
        self.classifier = nn.Sequential(
            nn.Linear(384, 256),
            nn.ReLU(),
            nn.Linear(256, 2)
        )

    def forward(self, x):
        x = self.transformer(x)
        x = self.transformer.norm(x)
        x = self.classifier(x)
        return x
Add a dataset, optimizer, and loss function. Train the above Model class and check the result.
I found that DinoV2 achieved 95% accuracy within just 10 epochs when compared to 45% accuracy in the Resnet model.
you can find them Along with Annotated Research paper for an easy walkthrough in the Repo here.
Image Retrieval:
I implemented Image retrieval using Dinov2. I have used Dinov2 with Vit small with 14 as the patch size. It generates around 384 Image features whereas the base model generates 768 features. DinoV2 small model has worked well for me. you can increase Model levels depending on your use case.
 Retrieval result with DinoV2
I have also used FAISS for Image retrieval, as Cosine similarity is the most used metric to calculate the similarity between two embeddings, we do use the same. We can also use IndexIVFPQ i.e. Inverted File pointer with Quantization along with HNSW for Billion Scale database image retrieval.
Currently, we used Faiss.IndexL2 with Normalized features that returns the cosine similarity. you can check the Code in the below repo here
We can Also Use Image Similarity for
- Copyright Infringement of Art/others
- Deleting/Cleaning up of a Large Database of Images(as shown in the Automated Pipeline of DinoV2).
- Image Clustering/Classification into Hundreds of Classes to organize data.
- For Structuring/organizing large databases of images into folders.
- We Can Also use it for Content-Based Recommendation Systems, to recommend based on the object in the Image. ex: Movies, Online shopping, etc.
References:
- https://arxiv.org/pdf/2304.12210.pdf
- https://arxiv.org/pdf/2304.07193.pdf
- https://github.com/facebookresearch/dinov2
Thank you for being here
comment down your views, if any mistakes are found the blog will be updated with effect. Do follow and share.